We have launched a new solar design partner on the ETB Developer platform! With Solesca now available to everyone, our users can easily add advanced solar layouts to proposals. This partnership combines Solesca’s solar design tool with ETB Developer’s utility rate and financial analysis features, allowing our users to design solar and energy storage projects quickly and accurately.
Why Solesca and Energy Toolbase?
At Energy Toolbase, we are always looking to add partners to the platform to enhance your experience, and Solesca is no exception. Having Solesca as a design partner can help streamline solar project development, allowing you to complete the entire design and financial analysis process in a single workflow for commercial, industrial (C&I), and community-scale projects. Now, you can create layouts, simulate energy output, and perform all financial modeling solely within ETB Developer – accelerating the path from planning to deployment.
Its pre-CAD design capabilities allow our users to quickly generate layouts for roof-mounted and large ground installations, speeding up the design phase. Users can also run energy simulations and generate precise output estimates using the NREL SAM model, making it easy to confidently present project projections to customers. Solesca’s fixed pricing means no surprises, and its real-time collaboration tools let your team work together smoothly. We consider this partnership to be another step forward in providing you with a more comprehensive suite of solutions on the platform.
If you’re an ETB Developer user, you can start using Solesca today. For additional questions, contact your Energy Toolbase account manager, or book a call directly with Solesca. Not a user yet? Request a demo to discover how the integration can optimize your solar project workflow or start your free trial today.
How to Use the Solesca Integration in ETB Developer
- Starting the Design
To begin, open your proposal design in ETB Developer and click the ‘Add PV Array’ button. Next, select the Solesca logo.
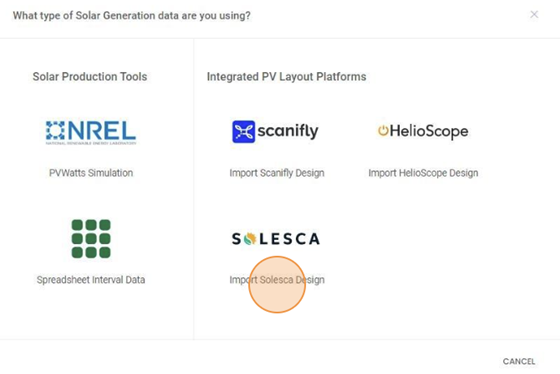
Figure 1 After clicking the ‘Add PV Array button’ within your proposal design, select the Solesca logo.
- Choosing Your Project Option
After selecting Solesca, you’ll see three options:
- Create a New Project & Design
- Create a New Design in an Existing Project
- Use an Existing Design
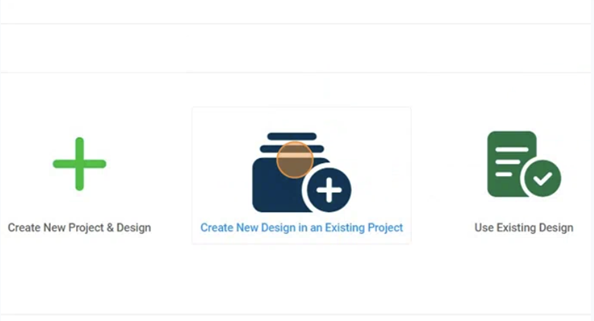
Figure 2 Select from three project options after clicking ‘Solesca‘
Option 1: Create a New Project & Design
- Define Project & Design Names: Enter the Project Name and Design Name for the new Solesca project.
- Save & Open in Solesca: After saving, you’ll return to ETB Developer, where you can click ‘Edit Design’ to open the design in Solesca and add PV arrays.
- Update in ETB Developer: When done in Solesca, use the refresh icon to update the ETB Developer design with the latest data.
(Screenshot: Show ‘Edit Design’ button in ETB Developer for Solesca design editing.)
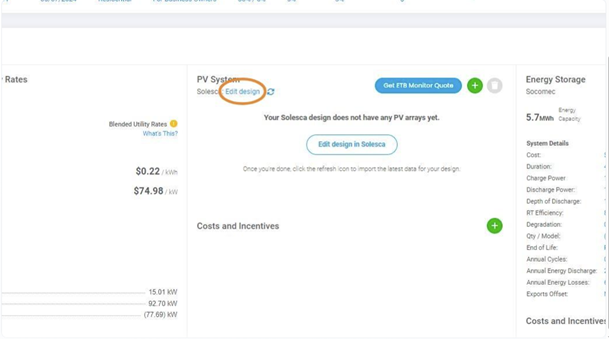
Figure 3 Easily add PV arrays using the ‘Edit Design’ button
Option 2: Create a New Design in an Existing Project
- Select an Existing Project: Choose the existing Solesca project to which you want to add a new design.
- Specify Design Name: Enter the Design Name and save.
- Edit & Update in Solesca: Open the new design by selecting ‘Edit Design’. After making edits in Solesca, refresh the ETB Developer design with the latest data.
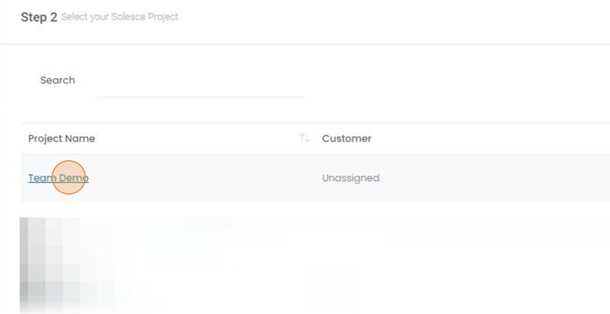
Figure 4 To create a new design within an existing project, begin by selecting the specific Solesca project to which you wish to add your new design.
Option 3: Use an Existing Design
- Choose Project & Design: Select the project and existing Solesca design you wish to import.
- Modify Details: Adjust system costs or field details if needed, then Save. Your design’s data will now appear in the PV section of your ETB Developer proposal.
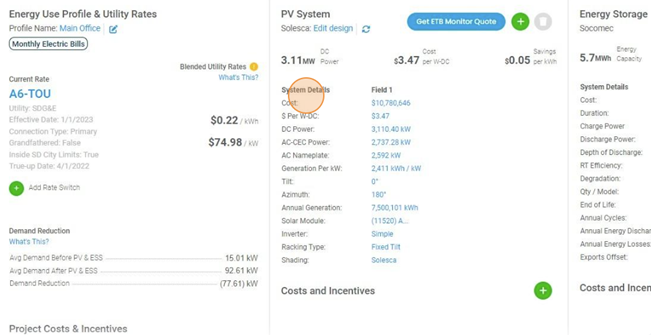
Figure 5 After importing your existing Solesca design into ETB Developer, you can easily modify and save the system cost and field details, then view your field data in the PV section of your proposal.
- Adding the Solesca Layout Image to Your Documents
Once your design is ready, you can add the layout image to your proposal documents in ETB Developer:
- Go to ‘Manage Documents’.
- Select the document where you want to add the layout image.
- Upload Layout Image: Click ‘Upload/Replace Image’, then choose ‘Upload Solesca Design’. Select the meter with your image, crop as desired, and save.
- View Document: To preview the image, click ‘View Document’.
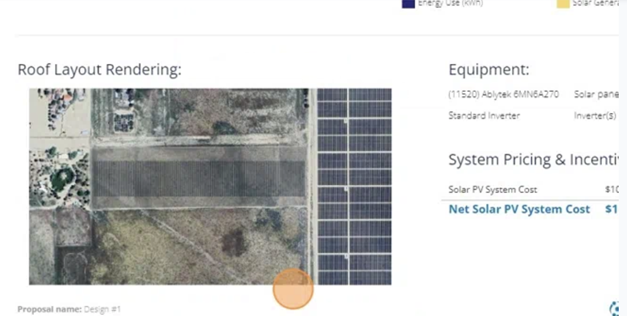
Figure 6 Easily view Solesca layout images within ETB Developer documents.
This seamless setup ensures a cohesive workflow from Solesca to ETB Developer, giving you the tools for efficient, high-quality solar and storage project designs.
